Anyone can take advantage of the WordPress themes which provides flexibility and lots of features. But if you do not know the English language then it is going to be very difficult for you to use the themes provided by WordPress as all of them are available in English language only.
Due to this problem those people who do not know English it is difficult or not even possible for them to use that themes. Most of the themes and plugins have not been developed in any other native language.
Due to this, they are not capable of using the premium and free facility provided by the WordPress as they cannot able to read the documentation part of that.
But as we all know there is always a solution to every problem. So, we have some measures by which we can translate WordPress themes and plugins into the language which you know(that is your native language). The following ways are listed below:
A. There is a software called poedit which can be used in PC.
B. There is a plugin also available which is known as “WordPress localization plugin”.
If any store owner uses poedit then this will provide support to a great extent in translating websites and apps. But here we will discuss the plugin ”Loco Translate”.
This is very useful and incisive plugin as it translates the themes and plugins of WordPress effectively and places it into the dashboard area of the WordPress itself. So, in this way, it becomes easy for a non-English speaker to use themes and plugins.
Now, we go into the detailed description of the “Loco Translate”.
Introduction to Loco Translate plugin:
Now, let us take a glimpse at “What is actually the Loco Translate?”
It is a free WordPress plugin provided by the WordPress whose main task is to do editing of WordPress Translation files. In other words, we can say it transcribe themes and plugins of WordPress in any native language which will be required by us, which is fully understandable to us.
Some features of Loco Translate:
1. Within WordPress admin area a built-in translator is being included.
2. There is a protected language directory maintained for saving if there are any custom translations.
3.Creation and updating of the language file straightly in your theme or plugin.
4. Built-in WordPress locale codes have been provided.
5.Guide is being provided for PO features like references, comments and plural form.
Now, we will go through the steps of translating themes and plugins using Loco Translate:
A. Install and Activate Loco translate.
B. Auditing of applicable settings and options.
C. Creation of a new language file and give it a name.
D. Selection of specific folder for saving translations.
E. Start your specified WordPress theme translation.
F. Change Language of WordPress installation.
Brief description:
A. Install and activate loco translate:
The first and foremost step for translating the WordPress themes is to install “Loco Translate”. Installing Loco Translate is so easy, for installing you have to go to dashboard area in WordPress then navigate to plugins and then select ‘add new’ option.
Then you have to search for a plugin that you want, that is Loco Translate in the search field. After finding it, just install it. After installing, activate the plugin. Once you have activated that plugin would be shown to you in your WordPress dashboard area.
B. Auditing of applicable settings and options:
After activation, you are able to see the Loco Translate on your dashboard. In the dashboard when you click on Loco Translate then that shows you two different options, first one is:
Manage translations: In this option, you can translate your WordPress plugins and themes efficiently in whatever language you want as per your convenience, in your browser itself.
And second one is:
Translations options: In this option, you can set or adjust your more settings like the compilation of your files or taking backup of files.
Although, if you do not know much about it like different features, then it is advisable to use pre-configured settings.
C. Creation of a new language file and give it a name:
As mentioned in above step you can manage translations by using the option “Manage Translations”. In this option, you will find all the applicable languages for plugins and themes which have been installed by you.
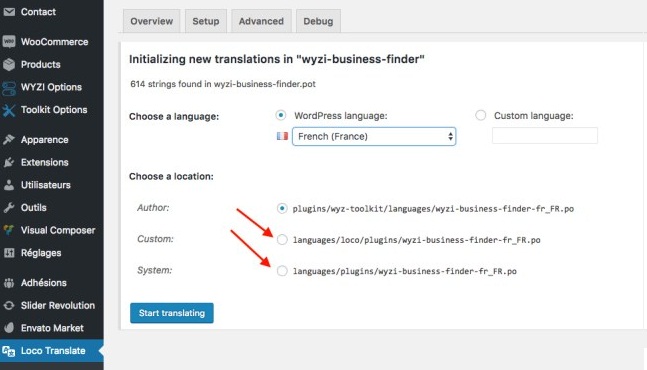
If you want to translate any of your themes then first you have to search that theme and then click new language for creating new language file. For giving a name to your file, you can give it manually or can search from the drop-down list.
D. Selection of specific folder for saving translations:
Whatever translations you have done, it is mandatory to find a safe place to keep your translations, so that it would not be lost in case if you need it later. So, before starting the translation it is best to decide where you want to keep translated themes. You can save it to the global theme language directory or you can also save it to language folder.
E. Start your specified WordPress theme translation:
Once you have done with all your file settings then you can start translating your theme into your native language. You can start translation by clicking on start translating button. There are two divisions of the translation screen.
In the upper division, you can see strings which are original and in the lower division you can see strings which are being translated by the Loco Translate in the language which was being selected by you.
In this, you can translate only some strings as per your requirement or you can change whole strings. After completing your translation click on the save button and now you have done with your translation.
F. Change Language of WordPress installation:
If you want to use your language file which has been translated by you have to change the language of WordPress installation to that specific language which you have chosen(in case if you have not been done earlier).
Conclusion:
Using Loco Translate is a very easy and convenient way of doing translations for WordPress themes and plugins as it takes care of all the technical aspects.


